Showing posts with label DIY. Show all posts
Showing posts with label DIY. Show all posts
Wednesday, September 5, 2012
chalkboard.

Thursday, August 30, 2012
chalk baord wall.


I have decided to do a quick little project over the weekend. Can you guess what it might be? After getting my roommate to agree to the plan I am off to buy some chalk board paint to cover one of the walls in our kitchen. I don't have a great shot of the wall yet but you can see it here a little.

Its the far wall between the door with slats and the pantry. I know its hard to see but its not large by any means and would be a cool way to break up all the beige walls. Many of you would probably say, well Lauren why don't you just paint your walls? The simple answer is I never know how long I'm going to be in a place. Its one of those things I feel should wait until I know I'm at least settled for more than a year. That being said, one small wall can very easily be repainted back so I'm taking the plunge.
Any tips on painting with chalk board paint? Or good paint brands to work with? Wish me luck! I'll be back with pictures soon!
xo
Thursday, July 12, 2012
lamp redo.

And the after...

I can't decide if I like it or not. It still needs a little work as the inside is a mess. I have to hot glue some ribbon on the seam inside and on the back for it to look finished or else it would look like this.

What do you think? Honest opinions! I look at it sometimes and I like it, especially that retro vibe it gives off. I look at it again and hate it. Love/Hate relationship perhaps?!?
xo
Tuesday, June 19, 2012
the move.

Well the move is officially over. It was rough and I am glad it is done. However, the new place is amazing. It feels like home instead of an apartment
which is nice as I have yet to feel like I was living in a home since I moved
out of my parents’ house six years ago.
I will be sharing pictures soon.
The layout is completely different than anything I’ve had before so it’s
taking some tweaking to get everything right but so far all the furniture is in
place!
As for my list for the weekend I crossed off quite a few
things…
…Celebrating Father’s Day and my Mom’s Birthday since my
parents will be in town
…Finish the move!!
…Go see Rock of Ages (Does anyone else think this looks
insanely good?)
…Get the kitchen completely unpacked and functional, I hate
not being able to cook or at least make a salad and know where a fork is
…Start working on getting the gallery wall rehung
…Potentially a cookout on Sunday!
Some things were completed some things weren’t, but that’s okay. I plan on taking my time to get this
apartment together. The last time I
moved I rushed to get things decorated, bought a lot of things I didn’t love
and ended up changing everything. This time around I plan on taking my time
and making sure I love something before going forward with it.
One thing I am really excited about doing is creating an inspiration/mood
board to cover the shelving on the built in desk. I never use the desk and I hate the look of
it so I figured this time around (I had one in my last apartment) I would cover
it up completely. The picture at the top
of this post is my inspiration. I just
need to figure out where I can find a piece of cork or canvas large enough to
make this project possible! I’ve heard
that ceiling tiles work great for this type of project so I will have to see if
I can get my hands on some of those.
Anyone else ever create a large scale inspiration board or something similar to it? How did you do it?
xo
p.s. Rock of Ages was awesome, if you like musicals go see it!
Monday, February 13, 2012
valentine's day cards continued...
Hope everyone had a great weekend! I have put the finishing touches are my homemade Valentines Day cards. I think they are really cute and will bring out a smile to the receivers. I just hope they actually make it on time!
I showed you how to start the cards here, this is how to finish them.
Take the two pieces of paper that you glued together and fold it accordion style to fit the size of the pictures you had printed.

Then take all of your pictures and put borders around them.

I cut mine out in a bubble pattern.
Then glue them in order to the accordion folds. As so...

And here is the finished project. Such a cute and easy project!


I showed you how to start the cards here, this is how to finish them.
Take the two pieces of paper that you glued together and fold it accordion style to fit the size of the pictures you had printed.

Then take all of your pictures and put borders around them.

I cut mine out in a bubble pattern.
Then glue them in order to the accordion folds. As so...

And here is the finished project. Such a cute and easy project!


I found the original idea from here. Oooo Martha what good ideas you have! What are you sending your Valentine this year?
xo
Thursday, February 9, 2012
craft love.
Tonight I did a little crafting for Valentines Day. So if you looking for a cute something to send to your Valentine this year, look no further!
I only have the start of the project because the lovely Walgreens near my apartment decided to close at 10pm tonight thus my pictures were not developed...mehhh! Its a DIY Valentines Day card that can be customized no matter what your looking to do.
You will need:
Construction paper
3 Pieces of poster board (or more depending on your saying, ours was "I LOVE YOU")
Glue Sticks
Scissors
Doilies
Camera

For the Card itself you need to glue two pieces together of construction paper end to end

To start use the construction paper to cover some poster board...cut out some letters for whatever you want your pieces of poster board to say...


Then piece it all together...

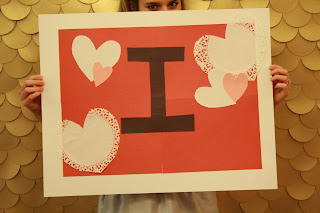
We cut out hearts from the paper and dollies, free-hand cut out all the letters and then arranged everything to our heart's desire.


And here is the first stage of the final product...
My roommate Audrey's I

My I, do you like our creepy eyes?
Our LOVE...


And YOU...


Once you finish your boards take pictures of yourself holding them. The point is to cover up your face for the first two, however we improvised with the first one. Out eyes sticking out on board 'I' was too funny not to do! Then on the last one, you reveal your identity thus the receiver finds out who send them the card.
I will be back on Monday with the finished result, Walgreens prevented us from finishing them tonight...shame on you Walgreens, what happened to 24 hours?
xo
I only have the start of the project because the lovely Walgreens near my apartment decided to close at 10pm tonight thus my pictures were not developed...mehhh! Its a DIY Valentines Day card that can be customized no matter what your looking to do.
You will need:
Construction paper
3 Pieces of poster board (or more depending on your saying, ours was "I LOVE YOU")
Glue Sticks
Scissors
Doilies
Camera

For the Card itself you need to glue two pieces together of construction paper end to end

To start use the construction paper to cover some poster board...cut out some letters for whatever you want your pieces of poster board to say...


Then piece it all together...

We cut out hearts from the paper and dollies, free-hand cut out all the letters and then arranged everything to our heart's desire.


And here is the first stage of the final product...
My roommate Audrey's I

My I, do you like our creepy eyes?

Our LOVE...


And YOU...


Once you finish your boards take pictures of yourself holding them. The point is to cover up your face for the first two, however we improvised with the first one. Out eyes sticking out on board 'I' was too funny not to do! Then on the last one, you reveal your identity thus the receiver finds out who send them the card.
I will be back on Monday with the finished result, Walgreens prevented us from finishing them tonight...shame on you Walgreens, what happened to 24 hours?
xo
Subscribe to:
Posts (Atom)